Please click here to read email if not displayed below:
http://acersgardencenter.com/news/15/29/

Acer's Florist & Garden Center
Edition 15.29 Acer's Florist & Garden Center July 2015

quote

Quotation of the Week:
"Summer afternoon, summer afternoon; to me those have always been the two most beautiful words in the English language."
— Henry James

 
sale
 
Hibiscus
 
coupon
Click here to Print
 
Hydrangeas
Acer's Carries a Huge Variety of All the Newest Hydrangeas 
HUGE SELECTION AND
GREAT PRICES

Hydrangeas are flowering shrubs that are easy to grow and can provide color in the garden from mid-summer through fall. They are used as specimen plants and in shrub borders. The flowers of some species can be dried and used in flower arranging and crafts.

The name comes from the Greek "hydra," meaning "water" and "angeon," meaning "vessel," referring to the plants preference for moisture and to the shape of the seed capsule.

Hydrangeas were first introduced by Sir Joseph Banks from a Chinese garden in 1739. The birth flower of June, they're almost always blooming then.

Bigleaf Hydrangea ( Hydrangea macrophylla ) is the most commonly planted kind, and the one with the largest and most show-stopping blooms.

Bigleaf Hydrangeas prefer partial shade. Morning sun and afternoon shade is perfect in inland areas, while on the coast, no shade is required. Give them moist, well-drained soil. Avoid planting hydrangeas on hot, dry, exposed sites.

Pruning Hydrangeas
Bigleaf hydrangeas form their flower buds in late summer for the following year, so pruning in late summer, fall and winter will remove potential flowers.

Prune bigleaf hydrangeas when the flower heads begin to fade. Prune off the flower heads and snip back other shoots to encourage branching and fullness. For a dwarfing effect, prune hard back to the double buds forming on either side of the stem near the base of the plant.

Choosing Colors
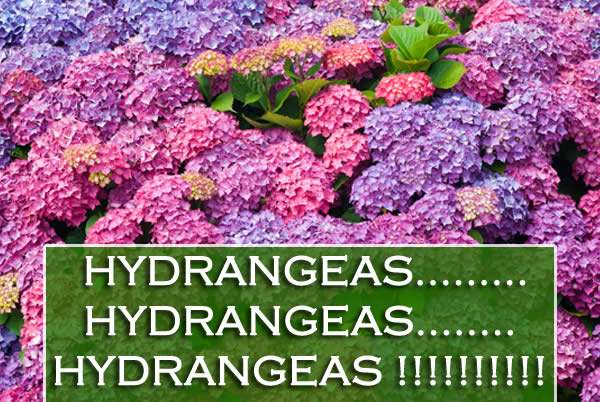
Hydrangeas are fascinating in that, unlike most other plants, the color of their flowers can change dramatically.

It would be nice if one could change the color of hydrangeas as easily as it changes in this little picture, but it is NOT easy. The people who have the most control over the color of their hydrangeas are those who grow them in containers. It is much easier to control or alter the pH of the soil in a container than it is in the ground.

On the other hand, hydrangeas often change color on their own when they are planted or transplanted. They are adjusting to the new environment. It is not unusual to see several different colors on one shrub the next year after planting. (They invariably shift toward the red end of the spectrum)

It is much easier to change a hydrangea from pink to blue than it is from blue to pink. Changing a hydrangea from pink to blue entails adding aluminum to the soil. Changing from blue to pink means subtracting aluminum from the soil or taking it out of reach of the hydrangea.

Old established hydrangeas may also be divided in the early spring, by digging them up and using a shovel to divide the clump, much as you would divide a perennial. This way, several plants can be obtained from one mature clump. Be sure to water the plants in very well, and keep watering all summer.

Here is a great resource for hydrangea information on the Web:
The American Hydrangea Society

 
plantlateseasoncrops

At this point in the summer, your garden should be growing strong. The plants that went in in May and June should be maturing nicely. It's about the time to start harvesting onions, potatoes, and garlic, if you haven't already. Once you've started harvesting, that newly available real estate should not go to waste! It's a good idea to get a last batch of cooler-weather crops in the ground.

You still have time to plant peas, beans, lettuces, and root vegetables like carrots, turnips, and radish. If you get them in soon, they will be able to mature before the first frost. These plants also tend to be somewhat resistant to early frosts, and will bounce back once the temperature gets back up during the day. That said, now is the time! The longer you wait, the likelier it is that Jack Frost will put an abrupt end to your gardening season.

 
Primer

How often do I need to re-pot my plants into larger containers?

Answer:
Unfortunately, plants are not like the fish in your tank that only grow to the size of their home. Plants grow root-bound when the amount of plant root volume exceeds the amount of soil volume in their container.

To check, gently lift out your plant from its container. If you can see mostly roots and very little soil, then it is time to transplant your plant into a larger container.

Select a container that is about 20% larger in volume than your existing pot. A good rule of thumb is not to use a container that is more than 4 inches wider and deeper than your existing root ball. Use a good potting soil and make sure that the top of the existing root ball is even with the top of the soil in the new container.

When you are done, you should have no more than 2" of new soil surrounding all sides of the root ball. Add a little starter food, water in and you're good to go!

 
blossomendrot

Blossom End Rot is a common problem in the garden. There are a number of reasons for it, but the symptoms are unmistakable. An otherwise great looking fruit will have a sunken, soft, rotten bottom on it. There's nothing worse in the garden than picking a beautiful fruit and turning it over to see it ruined.

Most commonly seen in tomatoes, Blossom End Rot also afflicts peppers, squash, and melons. It is mainly caused by a calcium deficiency, but that does not necessarily mean that the soil is lacking in calcium. Most times, it is a byproduct of irregular watering. To be sure your soil has enough calcium, add vegetable food that is high in calcium, and you can also spray on a high calcium foliar spray.

Another factor can be that your soil is too high in nitrogen. Avoid adding high nitrogen fertilizers and uncomposted manure. These will help your plants grow leaves, but prevent it from producing fruit.   Yet another thing that can cause problems is an imbalance in soil Ph (soil that is too acid or too alkaline can reduce the plants' ability to absorb calcium).  If you're not sure, you can get a soil testing kit or take some soil into your garden center to be tested.

The biggest thing is to make sure that when you do water, the water gets down to the roots evenly. You're better off watering every second or third day and soaking the beds deep than doing a short watering every day. You should also be watering at the soil level, whether by using drip lines, soaker hoses, or by flood-irrigation. Water slowly and for at least 10-15 min to give the water time to soak into the soil. Avoid spraying the leaves, as it encourages fungus and can wash pollen out of the flowers.

However you go about it, you should be checking moisture levels before and a while after you water. If the soil is already moist, DO NOT WATER! It also helps to pay attention to the forecast. If rains are expected, you should hold off on water to avoid nature doubling down on the water. It also will help to have a good layer of mulch around your plants to retain moisture and to keep weed levels down.

Luckily, Blossom End Rot is a problem that can be solved. If your plants are afflicted, try some of these steps. Pull off affected fruits as soon as they form to keep the plant from wasting energy on them, and keep adjusting your watering until it goes away. Any changes you make will only be seen on fruits that begin to form after you've made them. With a little time, and a little practice, you'll be growing some great tomatoes.

 
2077 Jericho Turnpike, Commack
631-343-7123
www.acersgardencenter.com
Open 7 days a week - 9 AM to 7 PM